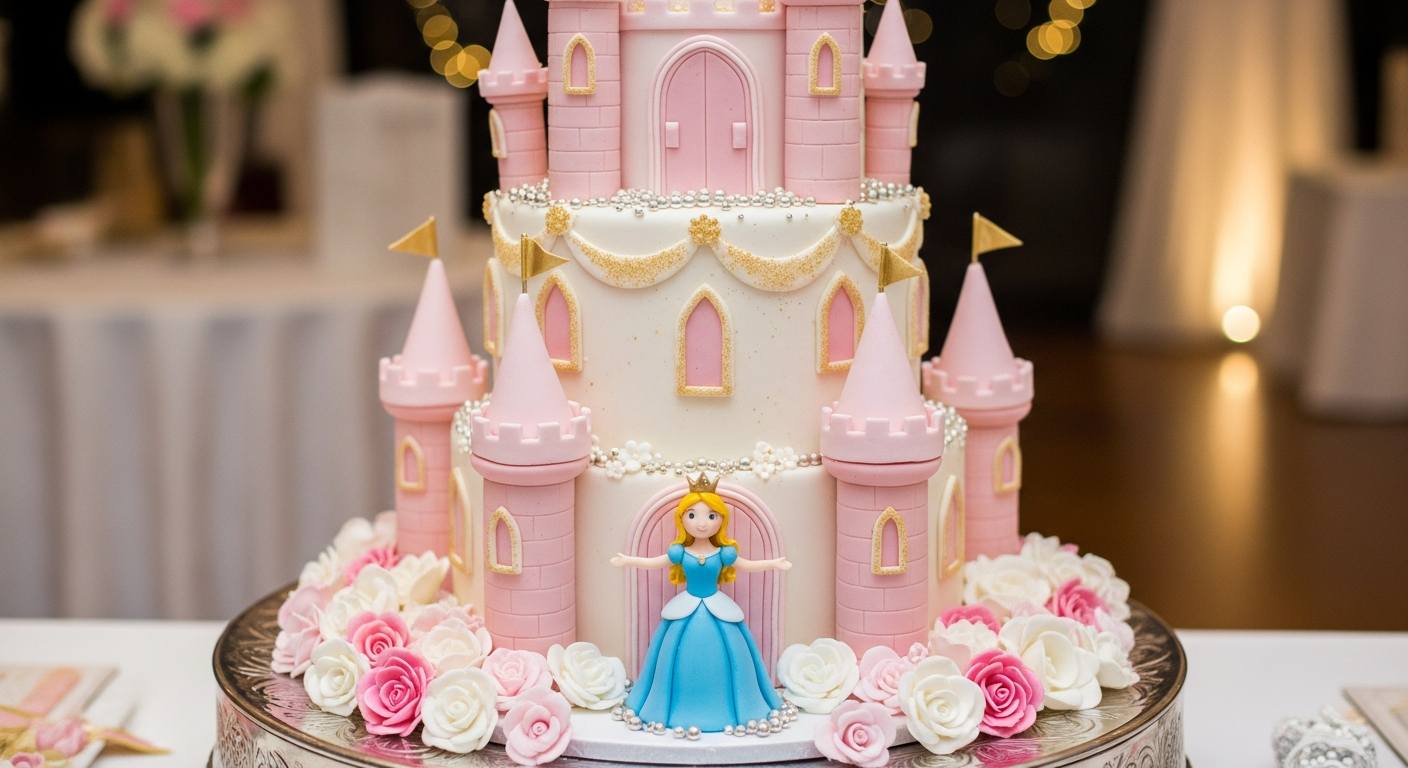
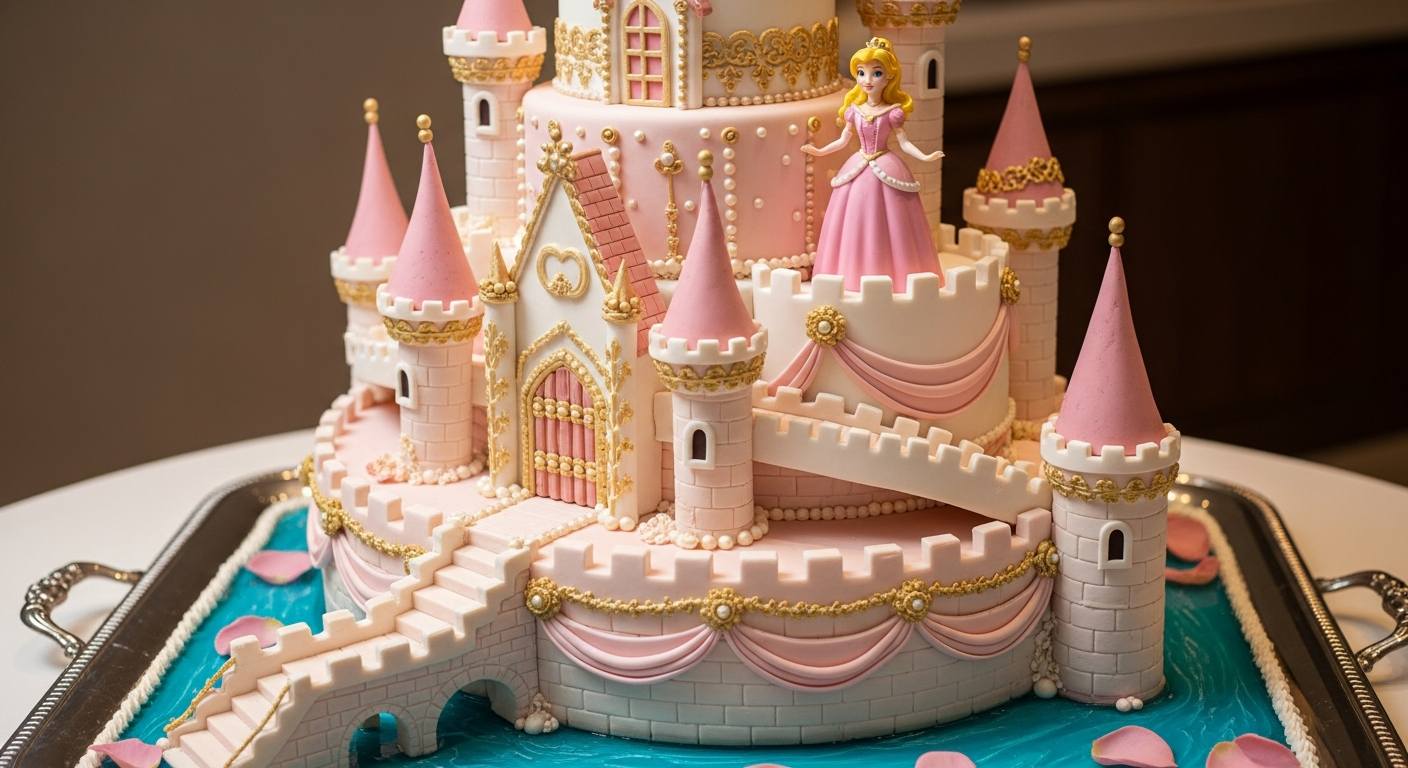
A castle cake with a princess is a multi-tiered birthday cake decorated to look like a fairy-tale castle complete with towers, turrets, and usually a princess figure or theme. It’s the perfect centerpiece for a princess-themed party. In fact, recipe sites describe a princess castle cake as something “little girls dream about”, and even say it can be “as simple as building with blocks”. In practice, these cakes often feature pastel pink or purple frosting, candy “stone” blocks, and decorative turrets, creating “any little girl’s dream cake”. Below we’ll cover how to plan, build, and decorate a fun, family-friendly princess castle cake.
Why a Castle Cake is Perfect for a Princess Party
Princess parties are all about sparkles and stories, and a castle cake instantly sets the fairy-tale scene. Kids love anything that turns their birthday into a storybook adventure. As one parent blog explains, when a little girl was asked what cake she wanted, she replied she wanted “her very own castle,” leading to “an epic two-tiered castle cake complete with 7 turrets”. That’s exactly the kind of over-the-top yet memorable design that makes a party magical.
Castle cakes also show up great in photos and decorations. The tall towers and pastel colors grab everyone’s attention. Decorating blogs note that even beginners can handle these cakes – with a bit of planning, a “beautiful” two-tier castle design is very doable. In short, a princess castle cake is a show-stopping way to delight the birthday child and guests, tying the whole party theme together in edible form.
Planning Your Princess Castle Cake
Before baking, sketch out your design and gather ideas. Think about your party’s color scheme (common choices are pink, lavender, or mint green) and how elaborate you want the cake to be. Will it be one tier with a castle decoration, or a full two-tier “tower” cake? Below are key factors to consider:
-
Cake size and tiers. How many guests will you serve? A simple one-layer cake can be dressed up with turret decorations, but if you need more servings, plan for two tiers. (One source used four cake layers to make her two-tier castle.)
-
Flavor and frosting. Choose any cake flavor you like. Vanilla or chocolate are crowd-pleasers. Use a firm frosting (buttercream or ganache) under a layer of fondant or smooth icing so the surface looks like castle walls. (For example, one cake builder “crumb coated” with buttercream then covered the tiers in white fondant to get a clean castle look.)
-
Support structure. Tall cakes can be heavy, so plan internal supports. Use wooden dowels or thick cardboard tubes inserted straight through each tier to hold up the upper layer. Trim the dowels to size so the cake stays level.
-
Cake board/“yard.” Cover your cake board with green fondant or piped green icing to look like grass around the castle. This gives a finished look and ties the theme together.
Sketching a simple plan or finding inspirational photos can help. Pinterest and baking blogs are full of examples. Just remember: you can mix and match ideas, and your cake can be as fancy or as easy as you like. The goal is a fun, sturdy castle – not perfect architectural detail.
How to Build a Princess Castle Cake
Once you’ve planned it, building the cake goes in stages. Here’s a basic step-by-step outline:
-
Bake and level the cakes. Bake your cake layers (for a two-tier, you might bake two 8-inch rounds and two 6-inch rounds, or four square layers as some recipes do). Let them cool and trim the tops flat so they stack evenly.
-
Stack with supports. Put one large cake on the board (frosting side down). Add a bit of frosting between each layer. After stacking the bottom tier, insert dowels straight down through it (cut off flush) to bear the weight of the top tier. Then place your second cake on top.
-
Crumb coat and cover. Spread a thin “crumb coat” of buttercream or ganache over all tiers to trap crumbs. Chill briefly, then cover the cake in a final smooth layer of buttercream or roll out fondant to drape over it. Smooth the fondant to look like castle walls.
-
Create the turrets. For towers, use sugar cones or cardboard tubes. One DIY method is to cover ice-cream cones (flat-bottomed or waffle cones) with colored fondant for the turret roofs. Stand cones upside-down at the cake’s corners (or wherever towers go). For taller towers, you can glue a second cone on top of a shorter one. Another trick is filling paper towel rolls with icing or stackable cakes and topping them with cones. Cover these supports with fondant too so they match the walls.
-
Add details. Now decorate the walls and roof. Cut fondant windows and doors (use a knife or round cutters) and stick them on with water or edible glue. Pipe or draw bricks and vines with icing if desired. (One baker piped green icing as “grass” on the board and used pink icing to cover the tier seams.) You might also press on candy gems, sugar pearls, or edible glitter to make the castle look magical.
-
Top with a princess. Finally, personalize with your princess element. Insert a plastic princess toy (like a doll from a party store) or form an edible princess figure from fondant. You can position her in a turret or beside the cake. If you want a simpler option, just place a crown topper or a fondant tiara on top. This finishing touch makes the theme clear – a regal castle fit for a princess.
Each of these steps can be as detailed or as simple as you like. For example, one home baker reports that while assembling her castle was time-consuming, the end result was a “show-stopping castle cake that’s perfect for any princess party”. Take it step by step and have fun with each stage.
Decorating Ideas and Final Touches
With the structure done, focus on colors and embellishments to make the cake pop:
-
Color scheme. Pastel pinks, purples, and gold accents are classic princess colors. Tint part of your fondant or icing these shades. For example, you might roll pink fondant for the turret roofs and keep the towers white or lavender.
-
Windows and doors. Use fondant or small cookies for windows (round or arched shapes) and a door on the front. White or yellow sugar cubes, or piped icing, can look like stone blocks. Attach little gumdrop or candy knobs for doorknobs, or pipe on frames.
-
Icing details. Pipe swirls or ivy using a star or leaf tip with green icing. As one blogger suggests, after you build the towers, finish with “all the cute details like vines and flowers” to complete the fairy-tale look. You might pipe green vines climbing the walls, or scatter tiny buttercream flowers around the base.
-
Castle accents. Edible glitter and pearl sprinkles add sparkle. You can dust fondant elements with pearl dust for shimmer. If you have candy stars or sugar butterflies, those look whimsical on the towers. Flags can be made from fondant triangles on toothpicks.
-
Princess figurines. Placing a princess figure brings the cake to life. For example, the image below shows several princess dolls standing in front of the cake, matching the theme. (If using plastic dolls, remove them before serving, as they are not edible.) A fondant princess statue also works if you enjoy sculpting.
These decoration ideas are just starting points. Feel free to mix in your child’s favorite colors or storybook touches. For example, if you’re inspired by a specific fairy tale, you could recreate its color palette or symbols on the cake. The key is to make it visually fun and cohesive with the party theme.
Tips, Tricks, and Alternatives
Creating a castle cake can be a big project, so here are some extra tips and easier ideas:
-
Plan ahead. Bake cakes the day before and freeze them for easy carving. Assemble the cake early on party day so it has time to set.
-
Use simple molds. If you’re nervous about carving towers, consider buying styrofoam or plastic columns from a craft store to use as bases (just cover them with fondant or icing). Ice-cream cones and cardboard tubes work well for roofs and towers if handled gently.
-
Accept happy accidents. Even pros have mishaps. One mom discovered her finished castle cracked on the way to the party. She cleverly told the kids an “earthquake” happened in the kingdom – and everyone giggled!. So if a tower crumbles, just roll with it and make a fun story. At the end of the day, the kids remember the cake (and the story) as part of the adventure, not any flaws.
-
Simpler alternatives. If you want the castle look without full construction: make cupcakes around a small square cake (arranged as towers). Use a cardboard castle cake topper instead of sculpting one from cake. Or decorate a single-layer cake with icing turrets at the corners. You could even buy a plain layer cake and apply a castle stencil or edible image on the side. The theme is what counts, even if the cake itself is simpler.
-
Practice and have fun. Remember, this is supposed to be fun! Your child will be thrilled by the effort, and even a slightly imperfect castle will bring big smiles. After all, home-made means it’s made with love.
By following these ideas and planning carefully, you can create a memorable castle cake that delights your little princess and makes the whole party sparkle.